Emails
Mautic enables marketers to automatically send Emails directly to a group of Contacts in a Segment by using a Campaign, or send Emails on a one-time basis. Emails provide a means for direct interaction with potential customers, clients, and Contacts.
Email types
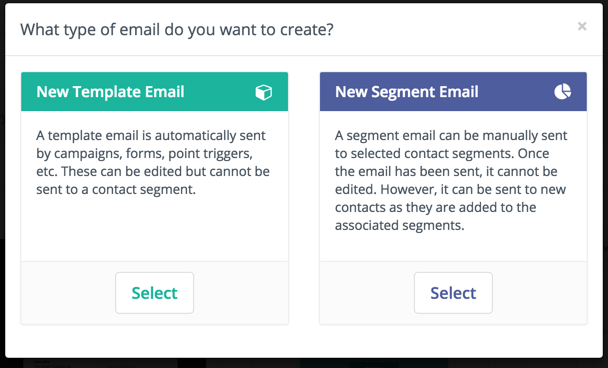
There are two types of Emails: template and Segment - broadcast - Emails.
Template Emails
Template Emails are transactional by default. They’re used in Campaigns, Form submit actions, Point triggers, etc. It’s possible to send template Emails to the same Contact multiple times. You can’t send template Emails to a Contact outside of another Mautic Component except when sending an Email directly to a Contact - in this case Mautic clones the content.
Note
For this reason, template Emails sent directly to a Contact aren’t associated with the template Email itself and thus stats aren’t tracked against it.
Segment (Broadcast) Emails
Segment Emails are marketing Emails by default. On creation the marketer assigns Segments to the Email. This determines which Contacts receive the communication. Note that each Contact can only receive the Email once - it’s like a mailing list.
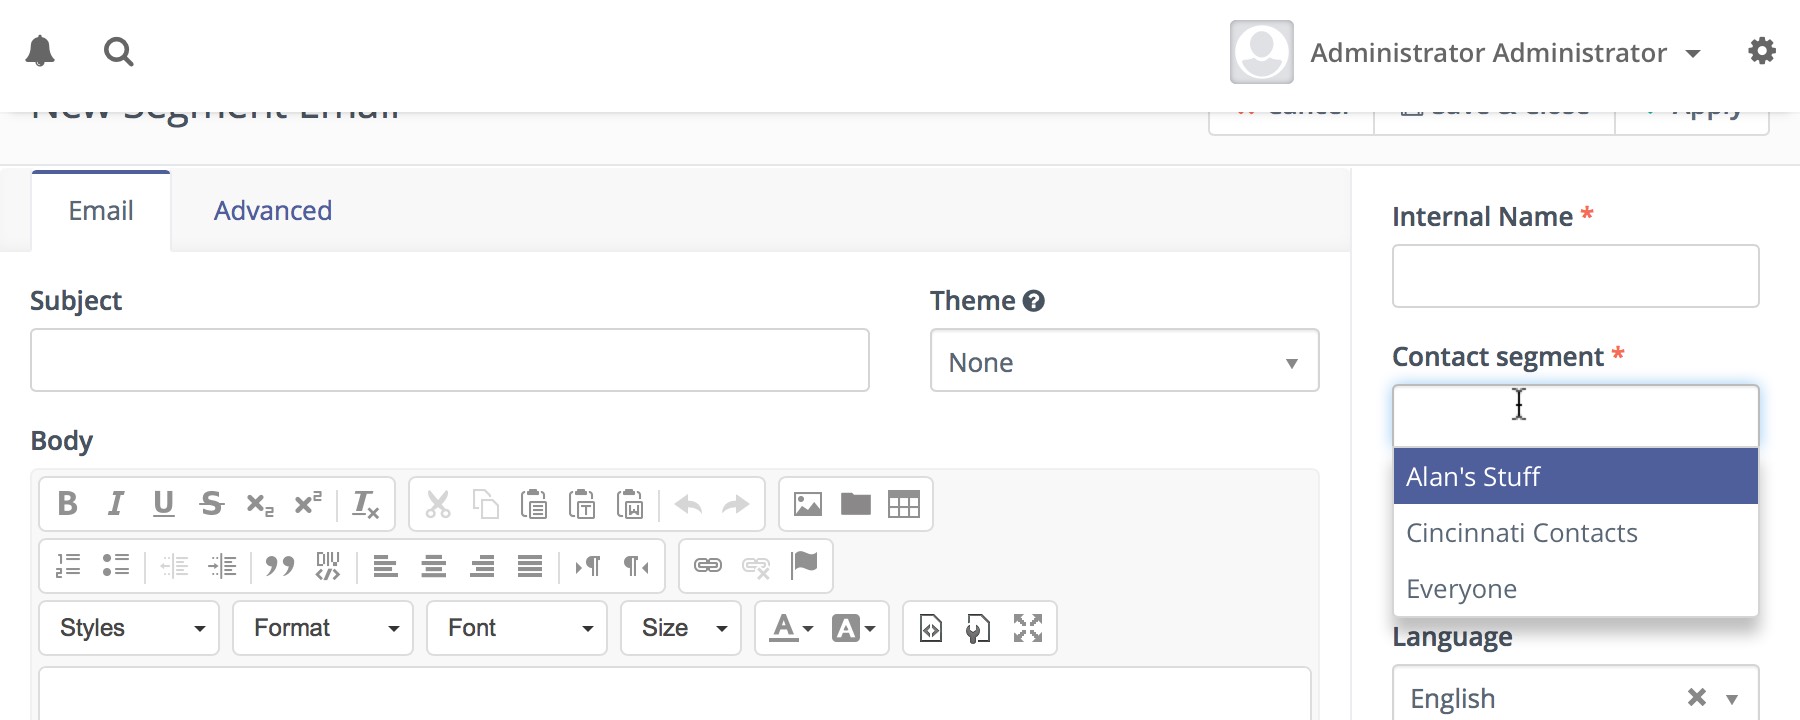
This entry field is a multi-select which allows you to choose several Segments if necessary.
Mautic initiates the sending of these Emails with a Cron jobs - see section on Send Scheduled Broadcasts - for example, Segment Emails - for more details on this.
Email formats
In Mautic, it’s possible to create Emails in both full HTML as well as basic text format - delivered as necessary to Contacts based on what their client supports. This is an important part of creating a strong relationship with Contacts by providing relevant information in the correct format.
Managing Emails
Email overview
The Email overview allows at-a-glance information regarding the success or failure of a particular Email. You can quickly see relevant information in regards to opens, bounces, successful click-throughs and other important statistics.
Translations
When creating the Email, there is an option to assign a language and a translation parent. By selecting a translation parent, the current item is then considered to be a translation in the selected language of that parent item. If a Contact has a preferred language set, they receive the translated version in their preferred language if it exists. Otherwise, they receive the parent in the default language.
It’s also possible to have translations of A/B test variants.
Base64 encoded images
It’s possible to encode all images in the Email text as base64. It attaches the image inside the Email body. It has several implications:
The main idea with this option is that most of the Email clients display the images directly, without the need to allow images.
Some Email clients like GMail require the approval to display Base64 encoded images due to the tracking pixel being an image, and won’t display the Base64 encoded images as a result. See the next paragraph for possible solution.
The Email body increases significantly if the Email contains many and/or large sized images. Some Email clients like GMail “clip” such messages and won’t display it directly.
Tokens
Mautic allows the use of tokens in Emails which gives the marketer the possibility to integrate a number of Contact fields in your Emails. These can be easily placed within your Emails and are automatically replaced with the appropriate text once sent.
Check the Variables documentation for a list of all the available default fields.
Default value
A token can have a default value for cases when the Contact doesn’t have the value known. You must specify the default value after a | character, for example:
Hello {contactfield=firstname|friend}
The |friend tells Mautic to use ‘friend’ if there is no first name present in the Contact field.
Encoded value
It’s possible to encode values used in a token using the following syntax:
Hello {contactfield=firstname|true}
The |true tells Mautic to encode the value used, for example in URLs.
Date formats
To use custom date fields in tokens, use the following format:
{contactfield=DATEFIELDALIAS|datetime}
{contactfield=DATEFIELDALIAS|date}
{contactfield=DATEFIELDALIAS|time}
The date outputs in a human-readable format, configured in the settings in your Global Configuration > System Settings under ‘Default format for date only’ and ‘Default time only format’.
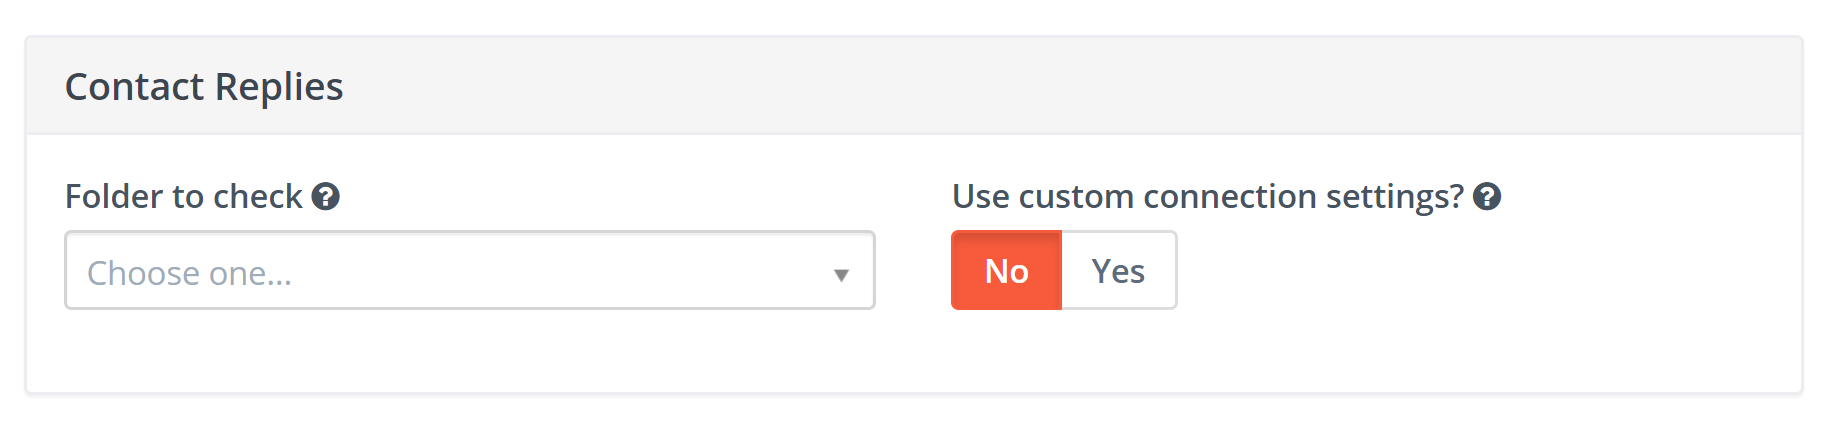
Contact replies
To make use of monitoring replies from Contacts, you must have access to an IMAP server other than Google or Yahoo as they overwrite the return path, which prevents this feature from working.
Note
To use the Monitored Email feature you must have the PHP IMAP extension enabled - most hosts already have this turned on.
Configure all Mautic sender/reply Email addresses to send a copy to one single inbox - most Email providers support this feature in their configuration panel.
Note
It’s best to create an Email address specifically for this purpose, as Mautic reads each message it finds in the given folder.
Go to the Mautic configuration and set up the inbox to monitor replies.
To fetch and process the replies, run the following cron command:
php path/to/mautic/bin/console mautic:email:fetch
Usage
Contact replies within Campaigns function as decision after an Email Send action, to take further action based on whether the Contact has replied to the Email. Mautic tries to read the inbox, parse messages, and find replies from the specified Contact. The Contact, when matched with an incoming reply, proceeds down the positive path immediately after the reply detection.

Mailer as Owner
This feature allows Mautic to automatically personalize Emails sent to a Contact who has an owner (Mautic User) assigned to them. This feature changes the from Email, from name and signature by changing the default setting to the Mautic Contact owner’s User setting.
Sending from the Contact owner
Open the Admin menu by clicking the cog icon in the top right corner.
Select the Configuration menu item.
Select the Email Settings tab.
Switch the Mailer is owner to Yes.
Save the configuration.
Overriding the mailer as owner setting
It’s possible to override the global setting on a per-Email basis.
There is a switch under the advanced settings of the Email, which allows you to decide whether to take the global mailer as owner setting, or the specified from address, into account.
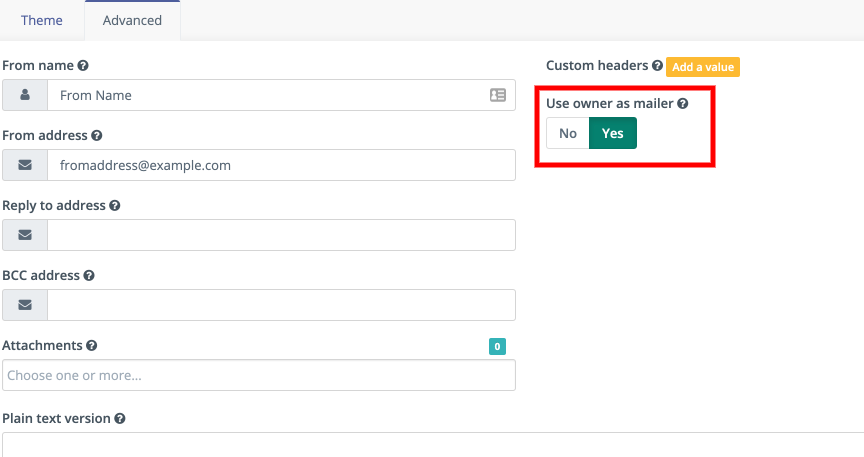
If set to Yes, the global setting takes precedence.
If set to No, Mautic uses the address and name supplied in the Email ‘From’ fields.
Signatures
Setting a signature happens in two places:
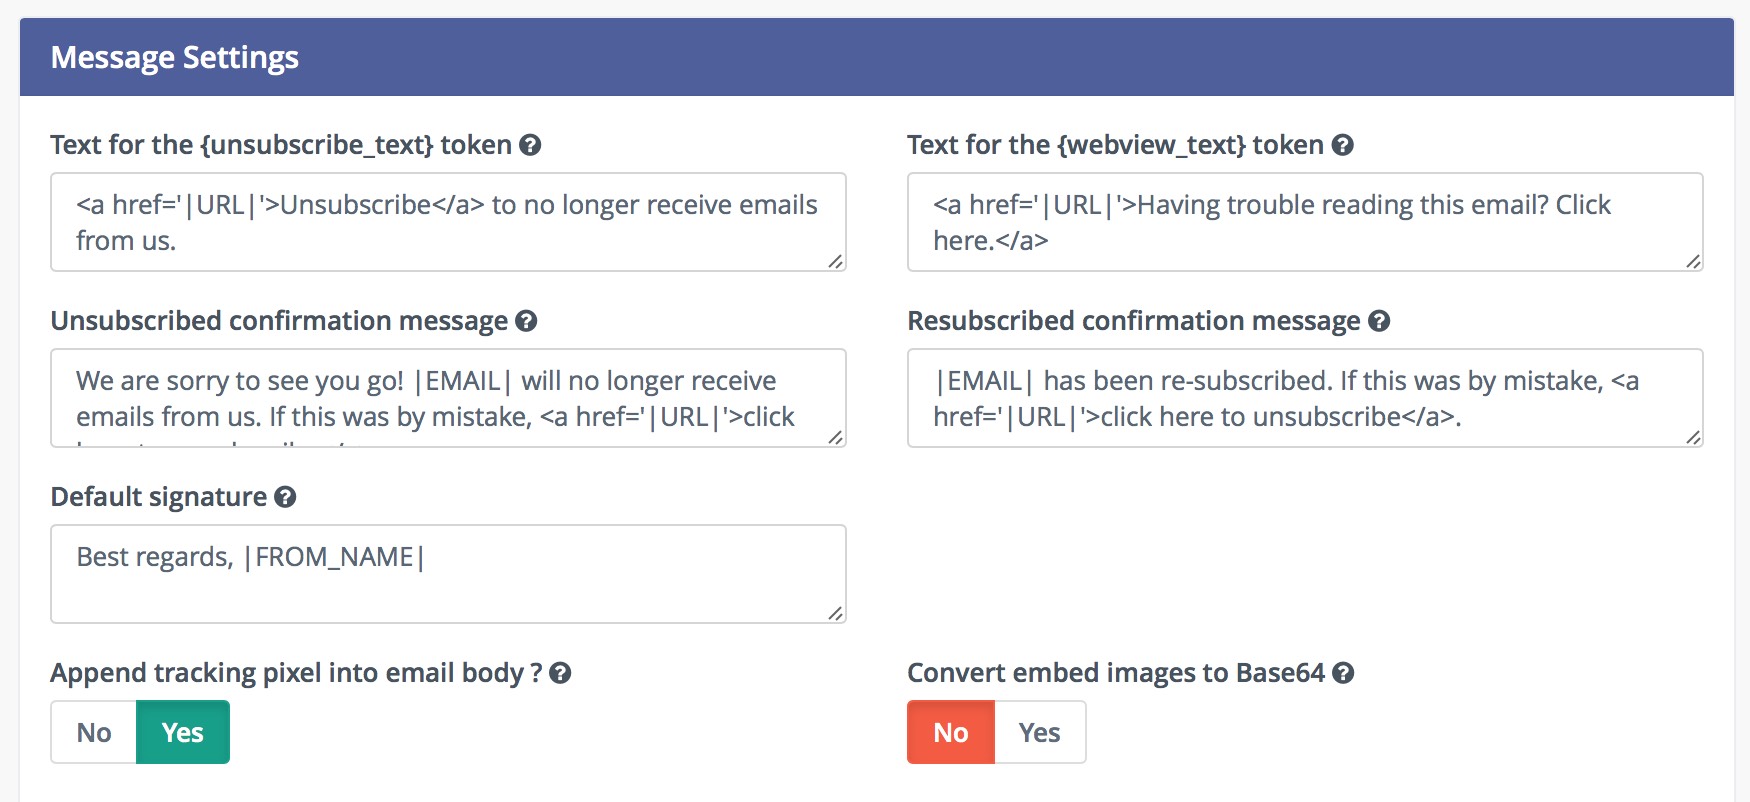
The default signature is in the Configuration > Email Settings tab. The default text is
Best regards,<br/>|FROM_NAME|.
Mautic replaces the |FROM_NAME| token with the name which is also defined in the Email Settings tab.
Mautic uses this signature by default if the Contact doesn’t have an owner assigned.
Every Mautic User can configure their own signature in their account settings. Mautic uses this signature by default if the Contact has an owner assigned to them.
Note
There are some exceptions where the Contact owner’s signature isn’t used, which is when a User sends an Email directly from a Contact’s profile. In this case, Mautic uses the currently logged in User’s signature, with the from name and Email specified in the Email send Form, and not the Contact owner. The values used are pre-filled with those of the currently logged in Mautic User.
It doesn’t matter if the Contact has another owner assigned or if it doesn’t have an owner at all.
Also, when sending a test Email this is also the case.
Using the Email signature
Marketers can place the signature into an Email using the {signature} token.
Email delivery
As Mautic uses the Symfony Mailer library since v5, it supports all Symfony Mailer core plugins out of the box. Transports for other Email services might be found on GitHub or Packagist.
SMTP transport
The SMTP transport is the default transport used for sending Emails with Mautic. It’s configured in the Mautic configuration under the Email Settings tab. The configuration is the same as in the Symfony Mailer documentation.
Mautic now uses a specific way of providing the connection details for Email transports to interpret, which is called a Data Source Name, or DSN. This is the example Data Source Name configuration mentioned in the Symfony Mailer documentation for SMTP:
smtp://user:pass@smtp.example.com:port
Mautic creates this automatically from the values entered in the Email configuration:

DSN part |
Example |
Explanation |
|---|---|---|
Scheme |
smtp |
Defines which email transport (plugin) will handle the email sending. It also defines which other DSN parts must be present. |
User |
john |
Some transport wants username and password to authenticate the connection. Some public or private key. Some just API key. |
Password |
pa$$word |
As mentioned above, read documentation for your particular transport and fill in the fields that are required. For SMPT this is for password. |
Host |
smtp.mydomain.com |
For SMTP this is the domain name where your SMTP server is running. Other transports may have the domain handled inside it so many wants to put just |
Path |
any/path |
This is usually empty. For SMTP this may be the path to the SMTP server. For other transports this may be the path to the API endpoint. |
Port |
465 |
Important for SMTP. The port value defines which encryption is used. This is usually 465 for SSL or 587 for TLS. Avoid using port 25 for security reasons. For other transports this may be the port to the API endpoint. |
Options |
timeout=10 |
This is optional. This may be the timeout for the connection or similar configuration. The config form will allow you to create multiple options. |
Note
Use the Mautic’s global configuration to paste in the DSN information, especially the API keys and passwords. The values must be URL-encoded, and the configuration form does that for you. If you are pasting DSN settings directly into the config/local.php file, you must URL-encode the values yourself.
Example API transport installation
If you want to use Sendgrid API instead of SMTP to send Emails, for example, you can install the official Symfony Sendgrid Transport by running the following command that is mentioned along others in the Symfony Mailer documentation.
composer require symfony/sendgrid-mailer
After that, you can configure the transport in the Mautic configuration. The example DSN is again mentioned in the Symfony Mailer documentation along with other transports. In the example of using the Sendgrid API, the DSN looks like this:
sendgrid+api://KEY@default
This is how it would be set up in Mautic’s Email configuration:

To replace the Sendgrid API key, add it to the relevant field in the Email configuration and save. Mautic now uses the Sendgrid API to send Emails.
Warning
It’s a nice perk that Mautic can use any transport provided by Symfony Mailer. However, be aware that such transports (from Symfony) don’t support batch sending, even via API. They only send one email per request, as opposed to a thousand emails per request as is the case with some Mautic transports, which can make them slow at scale. They also don’t support transport callback handling used for bounce management. If you plan to send larger volumes of Emails or need to use features which require callback handling, please consider using Email transports built specifically for such use. These plugins are available in the Mautic Marketplace.
The system can either send Emails immediately or queue them for processing in batches by a cron job.
Immediate delivery
This is the default means of delivery. As soon as an action in Mautic triggers an Email to send, it’s sent immediately. If you expect to send a large number of Emails, you should use the queue. Sending Email immediately may slow the response time of Mautic if using a remote mail service, since Mautic has to establish a connection with that service before sending the mail. Also attempting to send large batches of Emails at once may hit your server’s resource limits or Email sending limits if on a shared host.
Queued delivery
Mautic works most effectively with high send volumes if you use the queued delivery method. Mautic stores the Email in the configured spool directory until the execution of the command to process the queue. Set up a cron job at the desired interval to run the command:
php /path/to/mautic/bin/console messenger:consume email_transport
Some hosts may have limits on the number of Emails sent during a specified time frame and/or limit the execution time of a script. If that’s the case for you, or if you just want to moderate batch processing, you can configure batch numbers and time limits in Mautic’s Configuration. See the cron job documentation for more specifics.
Tracking Opened Emails
Mautic automatically tags each Email with a tracking pixel image. This allows Mautic to track when a Contact opens the Email and execute actions accordingly. Note that there are limitations to this technology - the Contact’s Email client supporting HTML and auto-loading of images, and not blocking the loading of pixels. If the Email client doesn’t load the image, there’s no way for Mautic to know the opened status of the Email.
By default, Mautic adds the tracking pixel image at the end of the message, just before the </body> tag. If needed, one could use the {tracking_pixel} variable within the body content token to have it placed elsewhere. Beware that you shouldn’t insert this directly after the opening <body> because this prevents correct display of pre-header text on some Email clients.
It’s possible to turn off the tracking pixel entirely if you don’t need to use it, in the Global Settings.
Tracking links in Emails
Mautic tracks clicks of each link in an Email, with the stats displayed at the bottom of each Email detail view under the Click Counts tab.
Unsubscribing
Mautic has a built in means of allowing a Contact to unsubscribe from Email communication. You can insert the tokens {unsubscribe_text} or {unsubscribe_url} into your Email to have the text or the URL show at your desired location. The unsubscribe text token inserts a sentence with a link instructing the Contact to click to unsubscribe.
The unsubscribe URL token inserts the URL into your custom written instructions.
For example:
<a href="{unsubscribe_url}" target="_blank">Want to unsubscribe?</a>
You can find the configuration of the unsubscribe text in the global settings.
Online version
Mautic also enables the hosting of an online version of the Email sent. To use that feature, simply add the following as URL on text to generate the online version link {webview_url}.
For example:
<a href="{webview_url}" target="_blank">View in your browser</a>
Bounce management
Mautic provides a feature which allows monitoring of IMAP accounts to detect bounced Emails and unsubscribe requests.
Note that Mautic makes use of “append” Email addresses. The return-path or the list-unsubscribe header uses something like youraddress+bounce_abc123@example.com. The bounce or unsubscribe allows Mautic to determine what type of Email it’s when it examines the inbox through IMAP. The abc123 gives Mautic information about the Email itself, for example which Contact it was it sent to, what Mautic Email address it originated from, etc.
Some Email services overwrite the return-path header with that of the account’s Email (GMail, Amazon SES). In these cases, IMAP bounce monitoring won’t work.
Elastic Email, SparkPost, Mandrill, Mailjet, SendGrid and Amazon SES support Webhook callbacks for bounce management. See below for more details.
Monitored inbox configuration
To use the Monitored Email feature you must have the PHP IMAP extension enabled (most shared hosts already have this turned on). Go to the Mautic configuration and fill in the account details for the inbox(es) you wish to monitor.
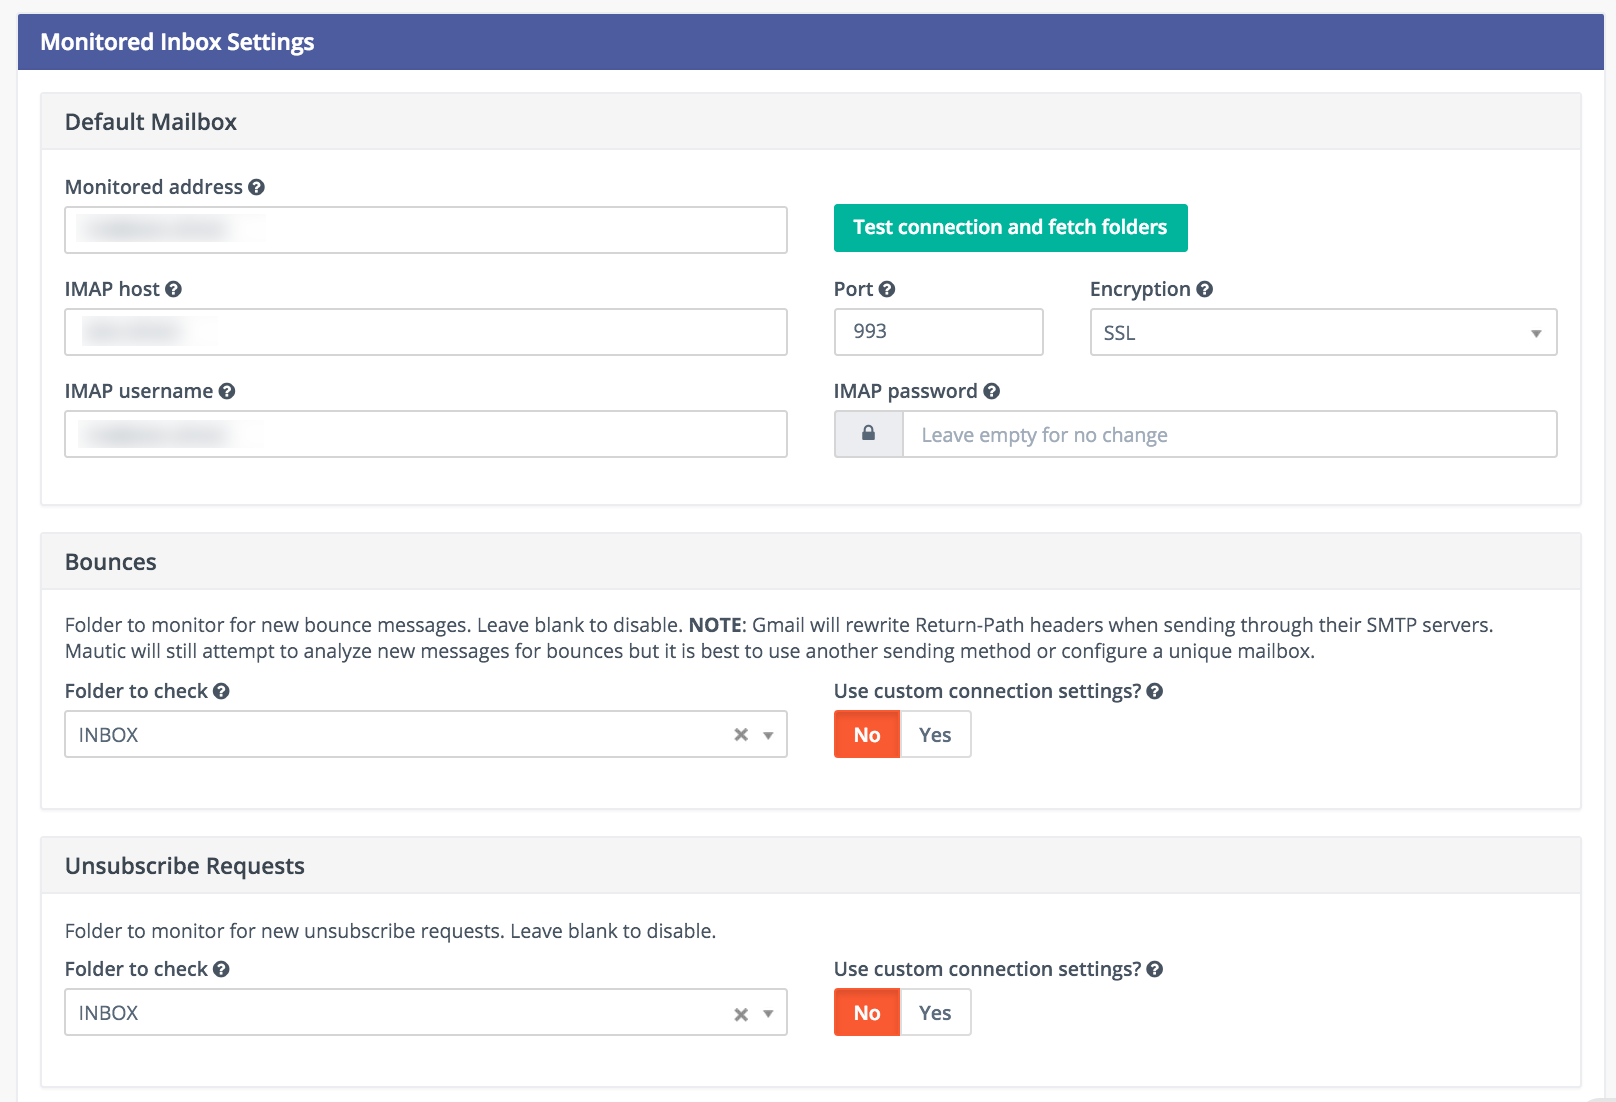
It’s possible to use a single inbox, or to configure a unique inbox per monitor.
To fetch and process the messages, run the following command:
php /path/to/mautic/bin/console mautic:email:fetch
Note that it’s best to create an Email address specifically for this purpose, as Mautic reads each message it finds in the given folder.
If sending mail through GMail, the Return Path of the Email is automatically rewritten as the GMail address. It’s best to use a sending method other than GMail, although Mautic can monitor a GMail account for bounces.
If you select an Unsubscribe folder, Mautic also appends the Email as part of the “List-Unsubscribe” header. It then parses messages it finds in that folder and automatically unsubscribe the Contact.
Webhook bounce management
Since Mautic 5 all the Email transports use the same Webhook (sometimes called callback) URL: https://mautic.example.com/mailer/callback. Please follow the documentation for the specific Email transport you’ve installed to get more information about the Webhook configuration.
Create a Segment with bounced Emails
This isn’t required, but if you want to be able to select the Contacts with bounced Emails easily - for example to delete all bounced Contacts - create a Segment with bounced Emails.
Go to Segments > New.
Type in the Segment name. For example Bounced Emails.
Select the Filters tab.
Create new Bounced Email equals Yes filter.
Wait for the
bin/console mautic:segments:updatecommand to be automatically triggered by a cron job or execute it manually.All Contacts with bounced Emails should appear in this Segment.
Troubleshooting Emails
Email open tracking
Mautic tracks Email opens using a tracking pixel. This is a 1 pixel GIF image in the source code of Email messages sent by Mautic.
When a Contact opens an Email using an Email client like Outlook, Thunderbird, or GMail, the client tries to load the images in it. The image load request is what Mautic uses to track the Email open action.
Some Email clients have auto loading images turned off, and Contacts have to selectively “Load Images” inside an Email message. Some automatically open all images before delivering the Email to the Contact.
If the images aren’t loaded for this reason or another, or if they’re opened automatically before sending the Email on to the Contact, Mautic doesn’t know about the open action. Therefore, Email open tracking isn’t very accurate.
Email link tracking
Before sending an Email, Mautic replaces all links in the Email with links back to Mautic including a unique key. If the Contact clicks on such a link, the link redirects the Contact to Mautic, which then tracks the click action and redirects the Contact to the original location. It’s fast, so the Contact doesn’t usually notice the additional redirect.
If the Email click doesn’t get tracked, make sure that:
Your Mautic server is on an accessible URL.
You sent it to an existing Contact via a Campaign or a Segment Email. Emails sent by the Send Example link, direct Email from the Contact profile, or Form submission preview Emails won’t replace links with trackable links.
Make sure the URL in the href attribute is absolute and valid. It should start with
http://or ideallyhttps://.You’ve opened the link in a incognito browser (not in the same session where you’re logged into Mautic)
Check if Mautic replaced the link in the Email with a tracking link.
Unsubscribe link doesn’t work
The unsubscribe link doesn’t work in test Emails.
This is because Mautic sends test Emails to a Mautic User and not to a Mautic Contact.
Mautic Users can’t unsubscribe and therefore the unsubscribe link looks like this: https://mautic.example.com/|URL|. However, the link does work correctly when you send the Email to a Contact.
Best practice is to create a Segment with a small number of Contacts to receive test Emails - for example, yourself - which ensures that you can fully test features such as unsubscribe behaviour.